
Using Pandopus
Everything in Pandopus hangs off one idea: a project has a roadmap of versions, the versions hold the work, and finishing a version is a release. This page walks through each part on the Mac and the iPhone.
Last updated October 12, 2026
Getting started
Pandopus runs on the Mac and the iPhone. The Mac is where you plan and manage: it has every feature. The iPhone is the companion for when you're away from your desk: it's for catching ideas, checking where things stand, and updating tickets.
The first time you open Pandopus on a new iCloud account you'll find an example project waiting, Bedsheet Queue. It has a full roadmap, tickets, and a first release already out, so there's something to look at in every part of the app. Click around in it freely; nothing in it matters. When you've seen enough, delete it from its Settings tab. If you want it back later, choose Help ▸ Add Example Project on the Mac.
If you're signed in to iCloud, everything you create syncs between your own devices automatically. There's no account to create and nothing to switch on. See iCloud sync.
Finding your way around
The sidebar
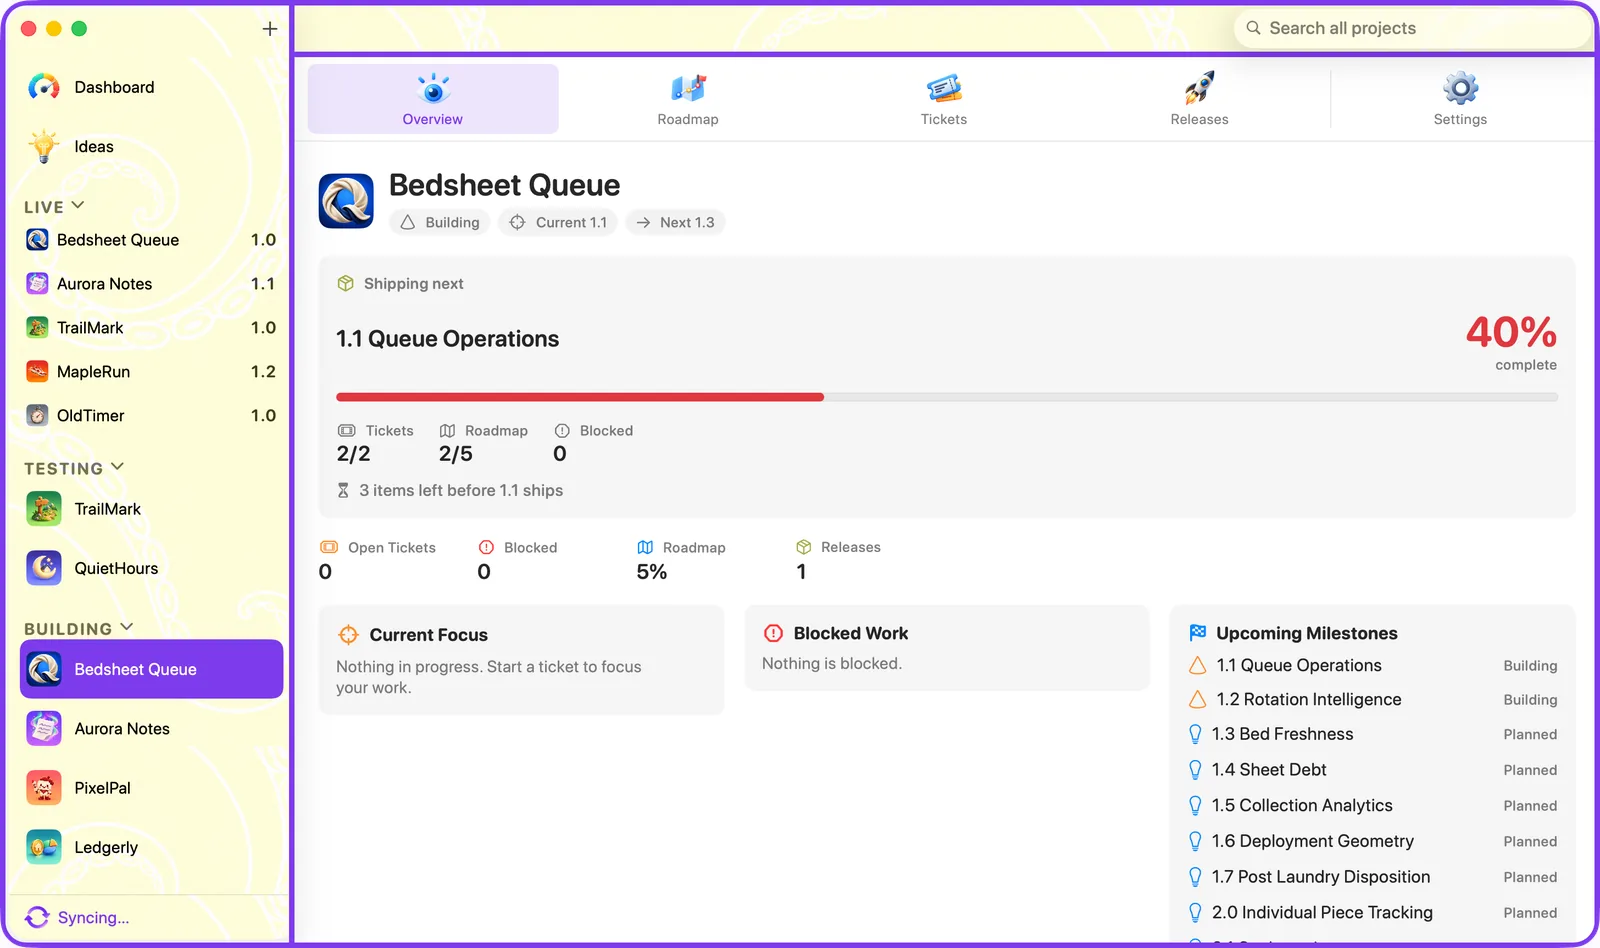
The sidebar on the left of the Mac window lists everything:
- Dashboard is the overview across all your projects: what's shipping next, what's blocked, ideas waiting to be sorted, and projects that have gone quiet.
- Ideas is where quick thoughts land before they belong anywhere. See Ideas.
- Live lists each project that has a release out on the App Store, with its current version number.
- Planned, Building, Testing and Archived hold your projects by stage. A project sits in exactly one of them. Click a section's heading to collapse it.
Use the + at the top of the sidebar to add a project.
A project's tabs
Selecting a project shows its tabs across the top:
- Overview: the project at a glance, with progress on the current version and anything blocked.
- Roadmap: versions and what goes in each.
- Tickets: the actual work.
- Releases: release notes and App Store listing for each version, and where a version is marked released.
- Settings: the project's name, icon, platforms, stage and ticket prefix.
Search
The search field at the top right of the window searches every project at once: project names, tickets, roadmap items and releases. Press ⌘F to jump to it. You can search for a ticket by its number, for example PND-42.
Projects
Creating a project
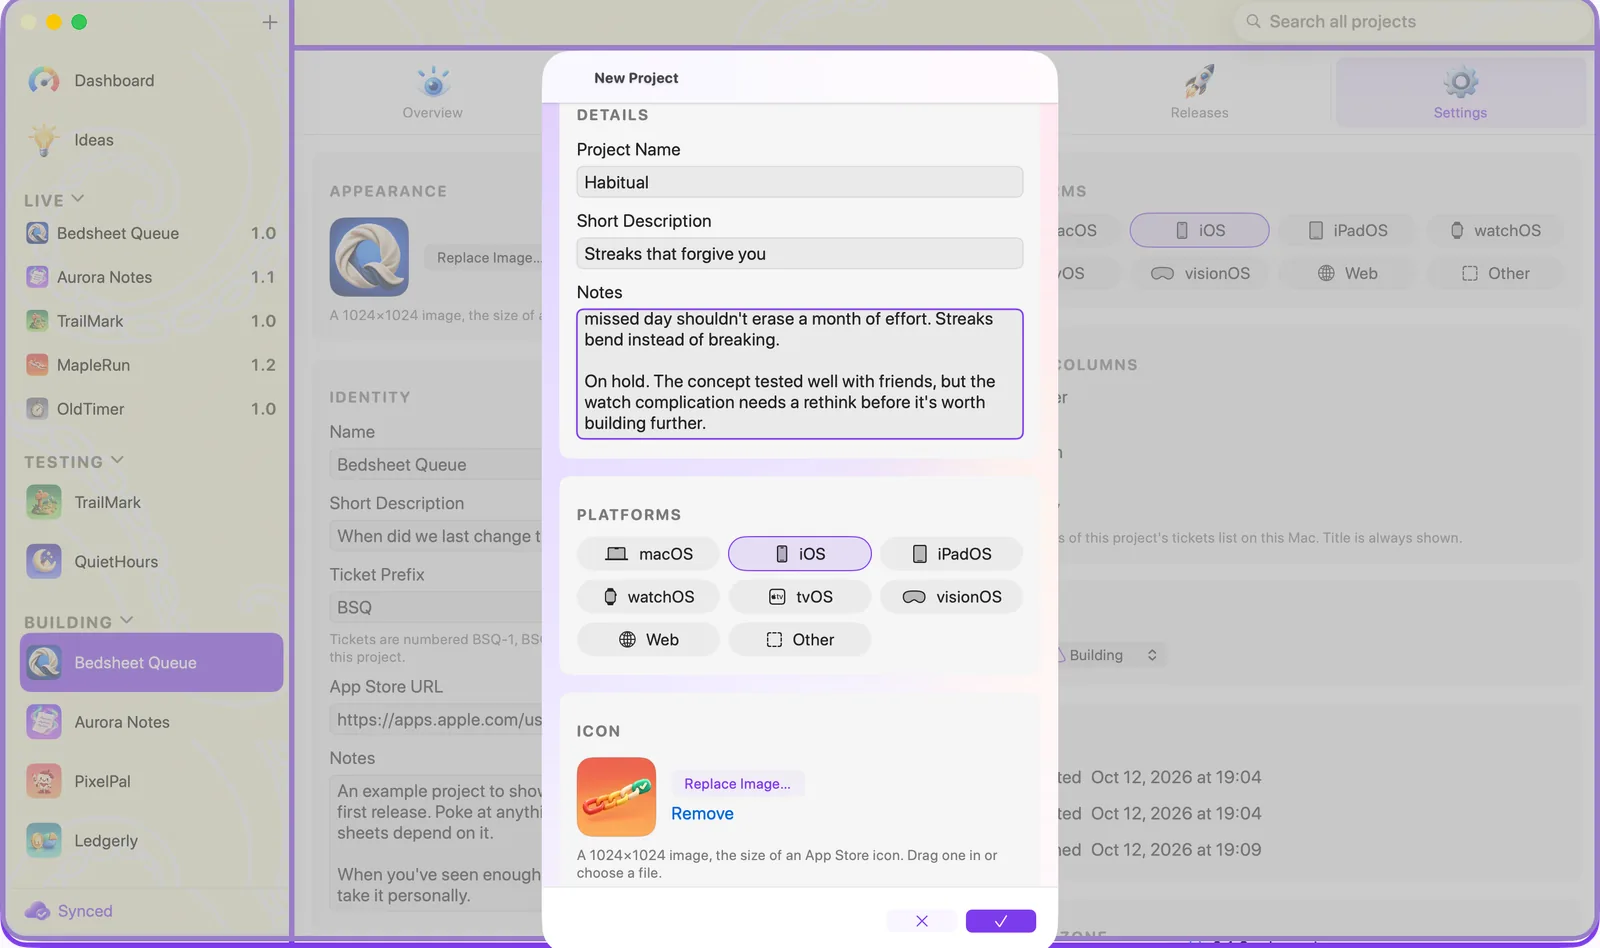
- Click + in the sidebar, or choose File ▸ New Project… (⇧⌘N).
- Give it a name. A short description and notes are optional.
- Choose the platforms it's for.
- Choose its icon: a square image of at least 1024 × 1024, the size of an App Store icon. Drag one in or pick a file.
- Click the checkmark to create it.
A new project starts in Planned. Projects are created on the Mac.
Stages
A project's stage decides which sidebar section it sits in. Change it in the project's Settings tab, or from Project ▸ Stage in the menu bar.
- Planned: you're still working out what it is.
- Building: work is under way.
- Testing: it's in testers' hands.
- Archived: set aside. Archiving keeps everything, and unarchiving puts the project back in the stage it was in.
Releasing a version to the App Store moves the project back to Planned, ready for the next version, and adds it to Live.
Project settings
- Name, Short Description, Notes: edit them in place; changes save as you type.
- Ticket Prefix: the three letters this project's ticket numbers start with. See Ticket numbers.
- App Store URL: the link to the app's App Store page. It's needed before a version can be marked released (betas excepted), and it's what the Live page opens.
- Platforms: which platforms the project targets.
- Ticket Columns: which columns the Tickets tab shows for this project, on this Mac.
- Danger Zone: delete the project, or delete its Live entry.
Deleting a project removes it and everything in it from all your devices. It asks first, and it can't be undone.
Projects as files
A whole project can be saved to a file and brought back, on the same Mac or another one.
- File ▸ Export Project… saves the project with everything in it: its roadmap, tickets, attachments, releases, ideas and history.
- File ▸ Import Project… opens such a file. If a project with that name is already there, you choose whether the file replaces it or comes in beside it under a numbered name.
- To back up everything at once, use Export All Projects… in Settings ▸ iCloud & Data. It saves a folder with one file per project.
The roadmap
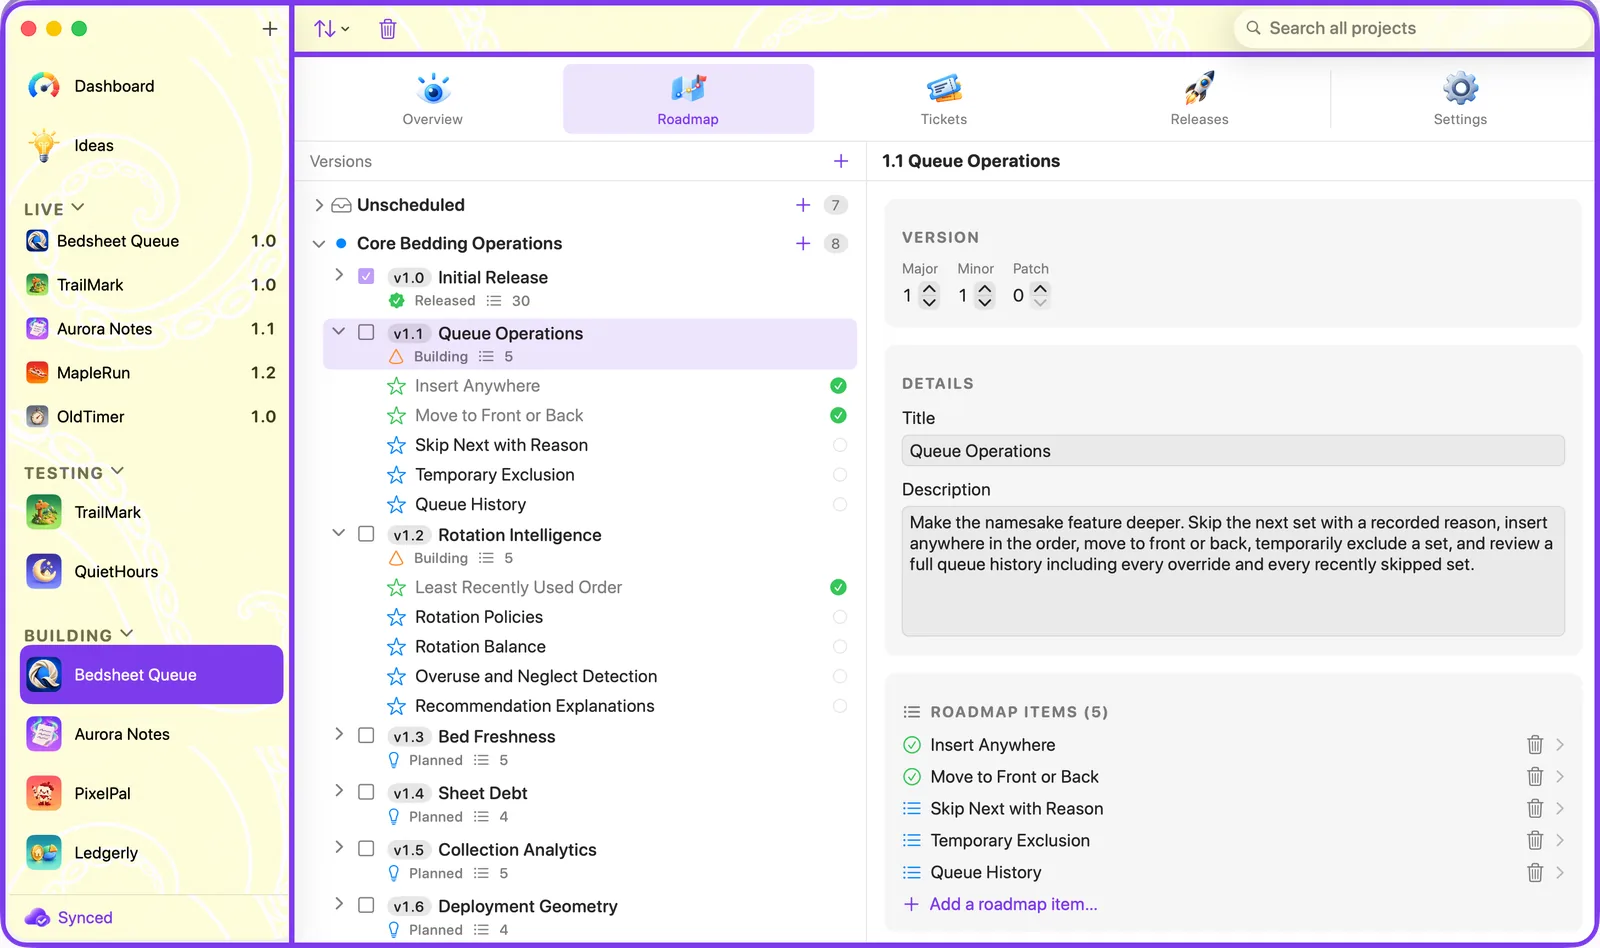
The Roadmap tab is the plan: a list of versions, each with the items that go into it.
Versions
Versions are numbered the usual way: a major version (2.0), a minor version (2.1), or a patch (2.1.1). Add one with New Version and choose Major or Minor. Select a version to see its details on the right, where you can change its number, title and description.
Drag a version to reorder it. Moving a version renumbers it and the ones around it, so the list always reads in order.
Roadmap items
A roadmap item is one thing a version will deliver: a feature, an improvement, a fix. Add one to a version with Add Roadmap Item, or press ⌘N while on the Roadmap tab. Drag items to reorder them or to move them between versions.
Items that don't have a version yet live under Unscheduled. That's the backlog: things you intend to do but haven't placed.
An item of type Spike is for investigation: finding out whether something is possible or how to approach it. If the answer is "we're not doing this", mark the spike Canceled; don't delete it. The decision is worth keeping.
Platforms
When a project targets more than one platform, a roadmap item can be for all of them or just some. Choose under Platforms in the item's details. All includes any platform the project adds later. Tickets have the same choice, and a ticket made from a roadmap item starts with the item's platforms.
Opening an item or version
Click a version or item to show it in the detail pane on the right. Double-click it to open it in a larger sheet without changing what's selected.
From roadmap to tickets
A roadmap item says what will be delivered; tickets are the work to deliver it. On a roadmap item, use Create Linked Ticket to make a ticket for it. A version's menu can create linked tickets for all of its items at once.
Linked tickets and their roadmap item stay in step:
- The item's status follows its tickets. It becomes Done only when all of its tickets are closed.
- A linked ticket lives in the same version as its item. Move the item and its tickets move with it.
- The version's Linked Tickets card lists its tickets. Click one to jump to it in the Tickets tab.
Importing and exporting a roadmap
A roadmap can be written as a JSON file and imported, which is the quick way to bring in a plan you've drafted elsewhere. The Import & Export menu on the Roadmap tab has:
- Import from JSON… adds the file's versions and items to the roadmap. Choosing to replace makes the roadmap match the file instead: versions and items the file names are updated in place and keep their tickets, and the rest are removed, their tickets kept. Released versions are never changed by an import.
- Export as JSON… saves the roadmap as a file in the same format.
- JSON Format… shows the format with an example. It's also under Help ▸ Roadmap JSON Format….
Finishing a version
Tick a version's checkbox to mark it Done once its work is finished. Done means the work is complete; it isn't released yet. Releasing happens in the Releases tab.
Tickets
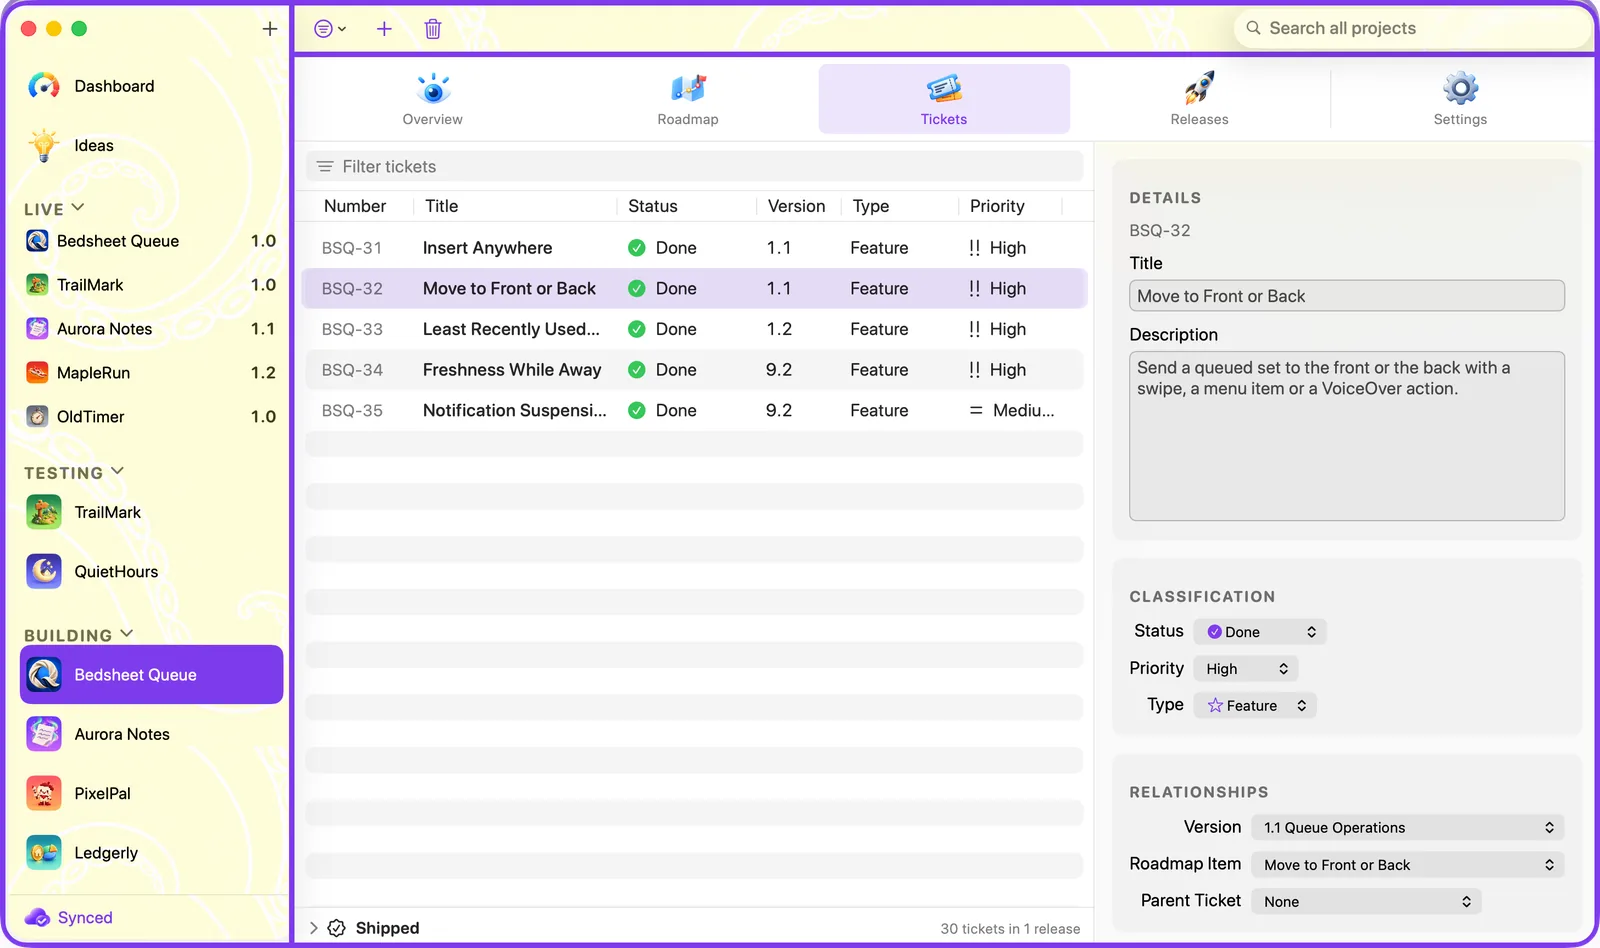
The Tickets tab lists the project's work. Select a ticket to see and edit it in the pane on the right.
Creating and editing
- Click New Ticket in the toolbar, or press ⌘N on the Tickets tab.
- Give it a title and a description. Set its Status, Priority and Type.
- Under Relationships, put it in a version, link it to a roadmap item, or make it a subticket of another ticket.
- Changes save as you make them. There's no Save button.
Ticket numbers
Every ticket has a number such as PND-42: the project's three-letter prefix, then a number that counts up within the project and is never reused.
- Click a ticket's number, in the list or at the top of the ticket, to copy it.
- Change the prefix in the project's Settings tab. Every ticket in the project is renumbered with the new prefix at once. Each project's prefix has to be different from the others.
- If you create tickets on two devices while one of them is offline, both might hand out the same number. When they next sync, the older ticket keeps the number and the newer one takes the next free one.
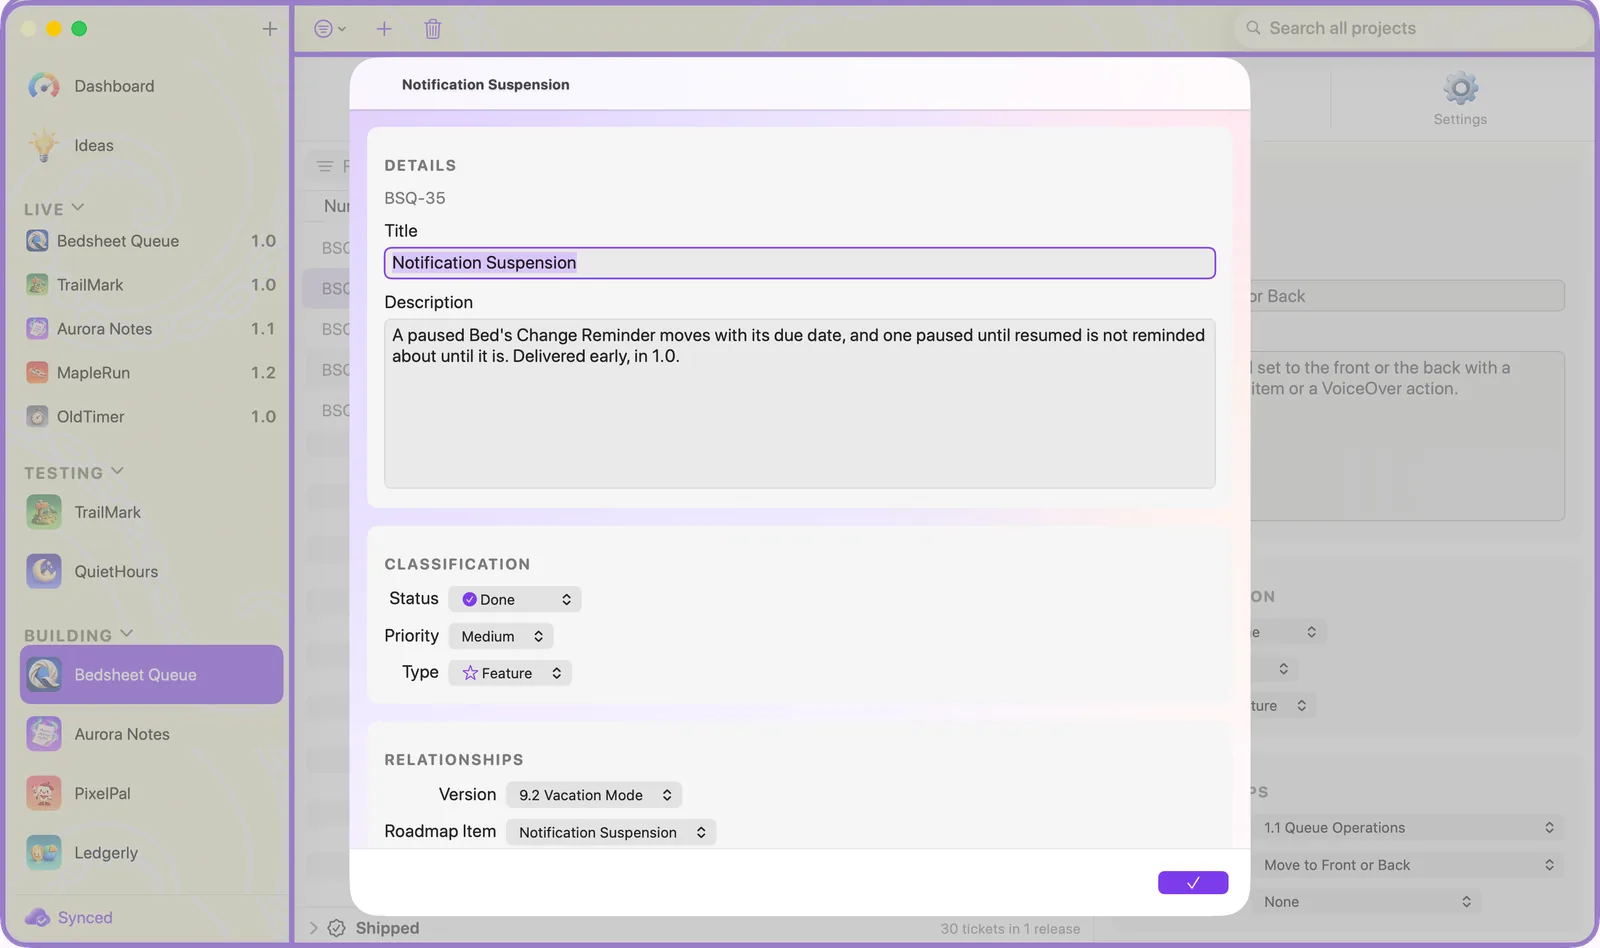
Opening a ticket in a sheet
Double-click a ticket to open it in a larger sheet. The ticket you had selected stays selected, so you can look something up and come straight back.
Subtickets
Break a ticket into smaller pieces with Add Subticket. Each subticket is a ticket in its own right, with its own number and status, and counts on its own toward progress. Subtickets live in the same version as their parent. In the list, click the triangle beside a parent to show or hide its subtickets.
Filtering
Type in Filter tickets to narrow the list by title, description or number. The Filter menu narrows it by status, priority, type or version, and has Hide Done and Blocked Only. Clear Filters shows everything again.
Columns
Drag a column's edge to resize it. Pandopus remembers the widths for each project. To choose which columns appear, use Ticket Columns in the project's Settings tab.
Attachments
Keep screenshots, PDFs and text files with a ticket. Drag a file onto the Attachments card or choose Add Attachment…. Files can be up to 25 MB each and sync with the ticket. Click one to preview it.
Shipped tickets
When a version is released, its tickets move out of the main list into a Shipped group at the bottom of the tab, one row per release. Click a release there to see its tickets. They're kept as a record and can't be changed, though you can still copy one to start follow-up work.
Releases
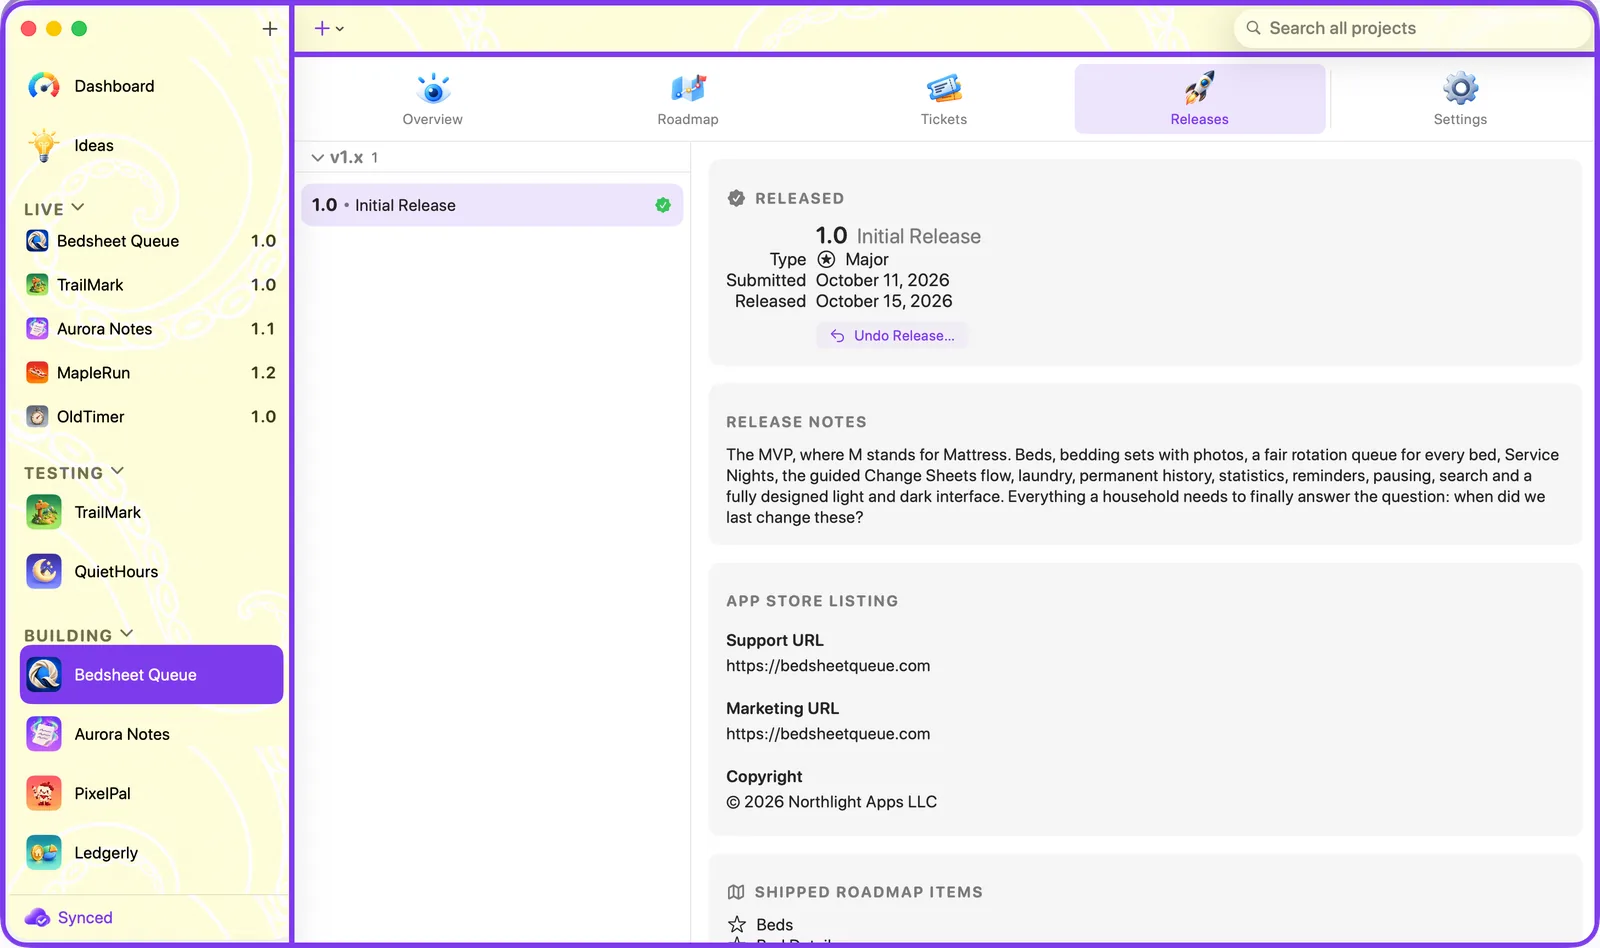
The Releases tab is where a finished version becomes a release. Each release belongs to one version.
Preparing a release
Create a release for a version, then fill it in at your own pace:
- Release notes: what's new in this version.
- App Store listing: promotional text, description, keywords, support and marketing links, copyright, and review information. Character counters show how much room is left in each field.
- Build number and known issues.
- Submitted date: set it when you send the build to App Review. The release then shows as Submitted.
The Work to Ship card lists the version's finished tickets and roadmap items, so you can write the notes from what was actually done.
A new release starts with its support link, marketing link and copyright filled in from your developer details.
A page per platform
A release covers every platform of its project with one shared page. When one platform needs different release notes or a different App Store listing, use Add Platform Page to give it its own: a copy of the shared page that you then edit separately. Each page's Work to Ship list shows only the work for its platforms. The release is still marked released once, for all of them. Remove Page puts that platform back on the shared page.
Marking it released
Click Release… when the version is out. Pandopus checks that it's ready first:
- the version is marked Done on the roadmap,
- every ticket and roadmap item in it is done or canceled,
- and the project has its App Store URL (not needed for a beta).
If something's missing, the release says what. Once released:
- The release and its version's work become read-only. They're the record of what shipped.
- The project appears under Live and moves back to Planned for the next version.
Undoing a release
If you marked a release by mistake, Undo Release turns it back into an editable draft. Only the most recent release can be undone.
Beta releases
A release marked as a beta records a TestFlight or beta build. It doesn't put the project under Live and doesn't change its stage.
Live
The Live section of the sidebar shows every project with a version on the App Store. Click one to see its release history, newest first, with each version's notes, listing and what shipped. From there you can open the app's App Store page.
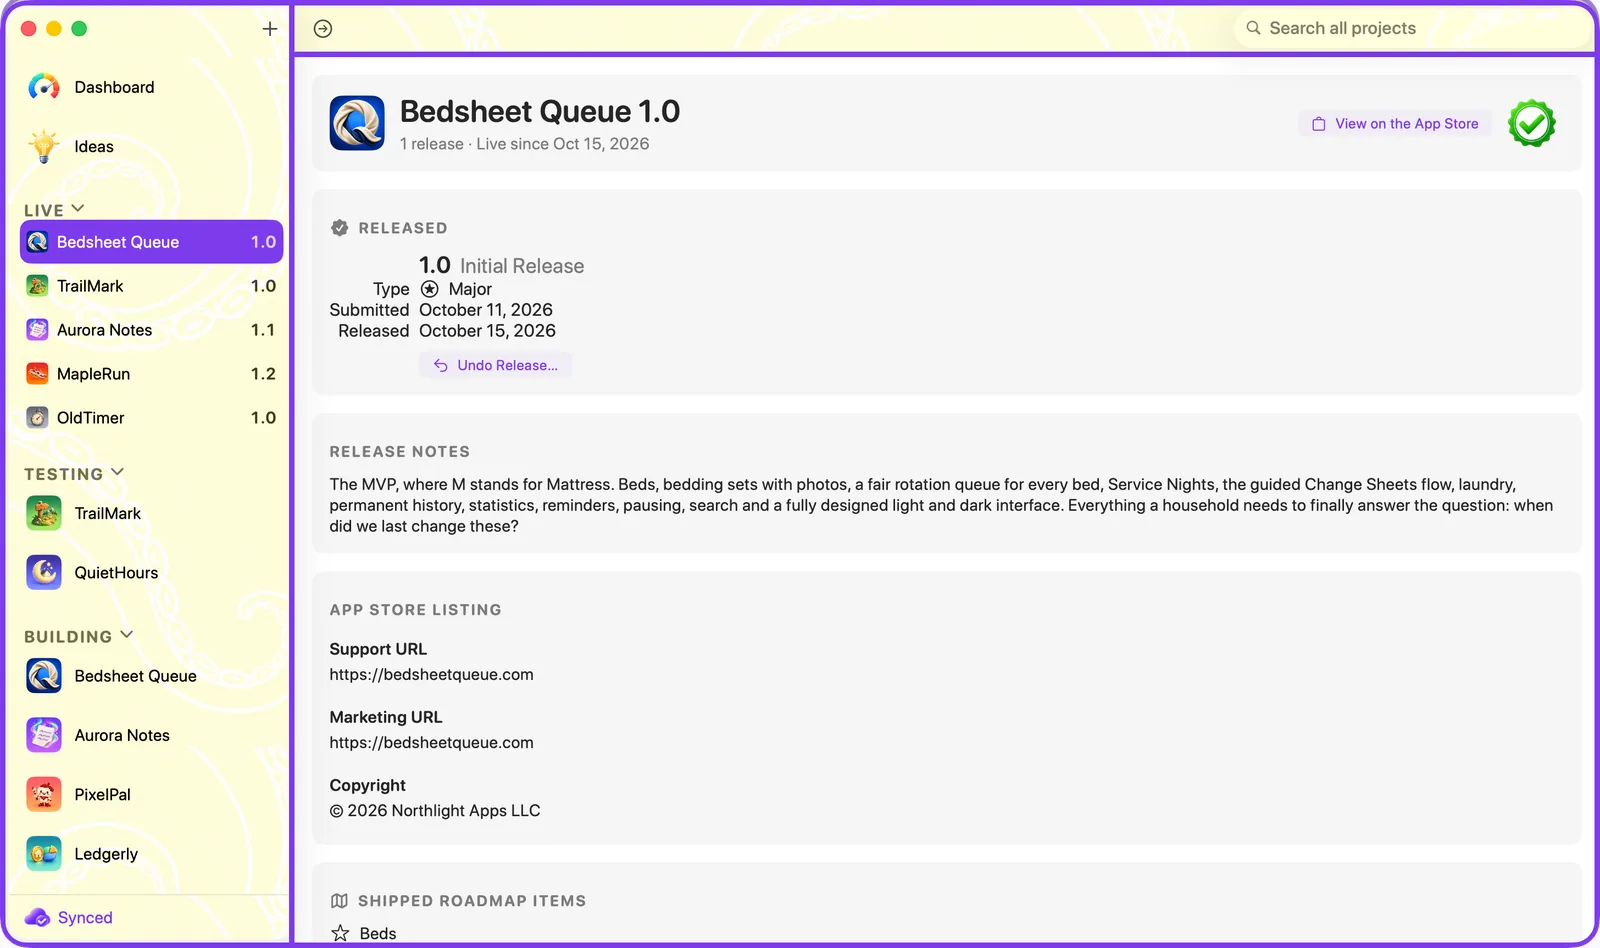
The Live page is read-only. To remove a project from Live, use Delete Live Entry… in the project's Settings tab under Danger Zone. That deletes the release history and sets those versions back to Done; the project and its roadmap stay.
Ideas
Ideas are for thoughts you don't want to lose but aren't ready to plan. The quickest way to catch one is on the iPhone, wherever you are; it shows up on the Mac moments later.
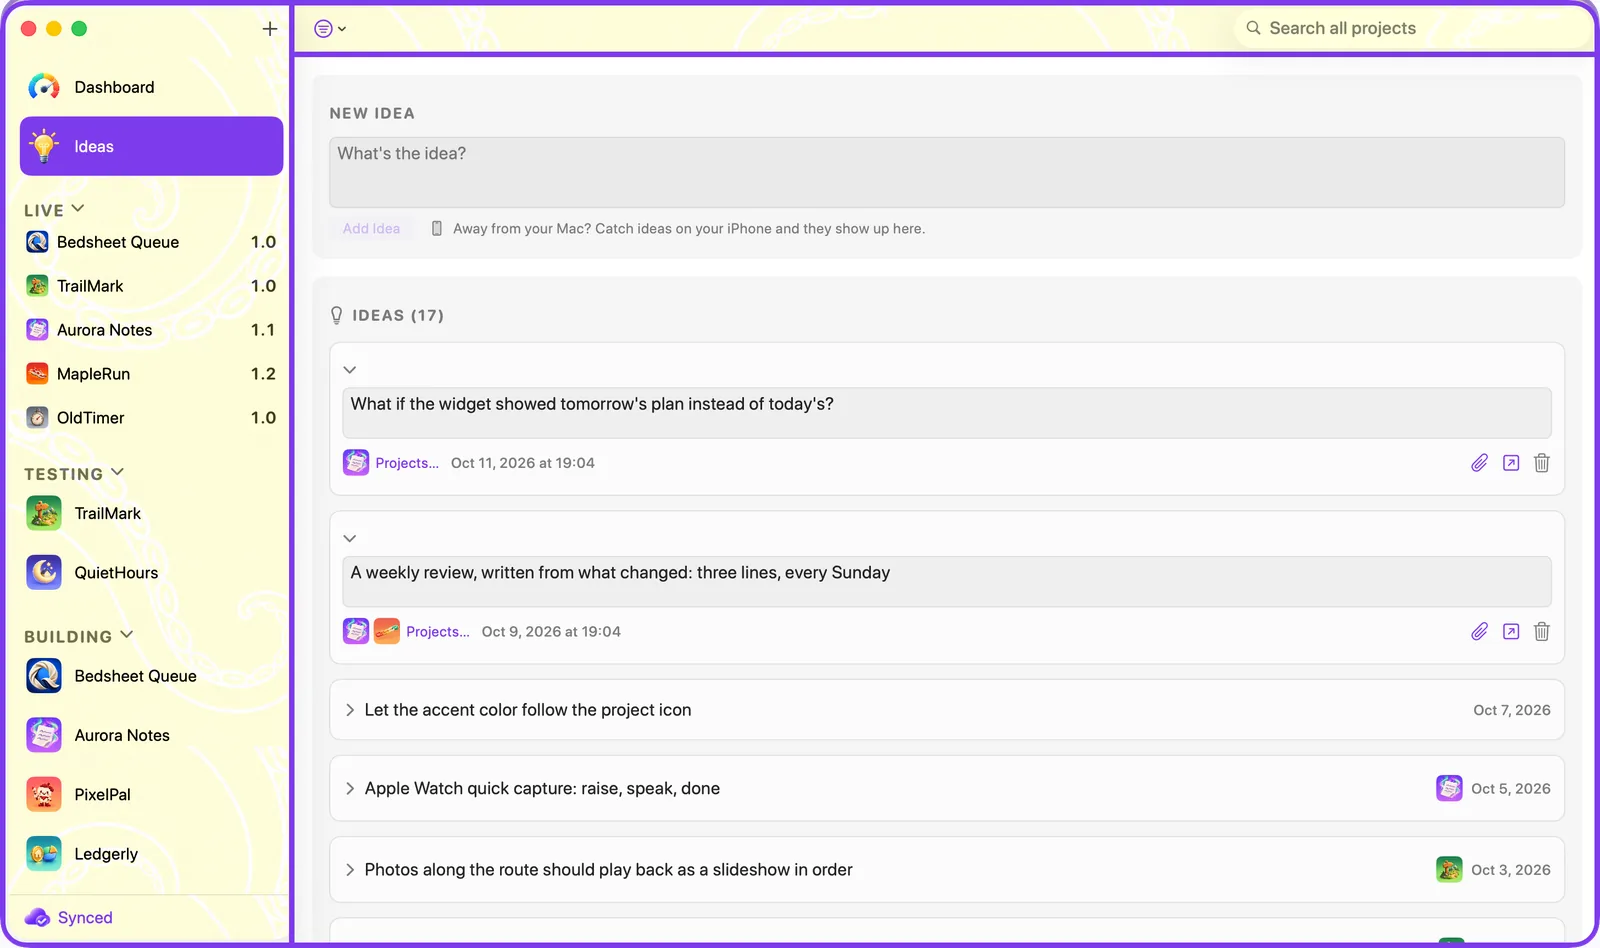
- Capture: type the idea and add it. You can attach images and files.
- File it under a project, under several, under All Projects, or leave it unfiled until you know where it belongs. Use Projects… on the idea to choose. An idea survives even if its projects are deleted.
- Turn it into work: when an idea is ready, make it a ticket or a roadmap item in a project. Its attachments come along.
Pandopus on iPhone
The iPhone app shows the same projects as your Mac and keeps in step through iCloud.
- Home shows your projects grouped by stage, with counts of open and blocked tickets across all of them. Tap a count to see those tickets.
- A project shows its roadmap, with progress on each version, and its tickets.
- Tickets: add a ticket, edit its title and description, and change its status. Priority, type, version and attachments are set on the Mac.
- Ideas: capture an idea with text and photos in a few taps.
- Live: read a project's release history and open its App Store page.
Creating projects, planning the roadmap and preparing releases are done on the Mac.
If changes made on the iPhone haven't reached iCloud yet, for example because you're offline, the home screen shows a card saying so. Tap it to see what's waiting. It clears by itself once the changes have gone up.
iCloud sync
Pandopus keeps your data on your devices and in your own iCloud account. It syncs between your Mac and iPhone automatically whenever you're signed in to iCloud on both with the same Apple Account.
- The line at the bottom of the Mac's sidebar shows the sync status. Synced means everything is up to date.
- You can keep working offline. Changes are saved on the device and sent when the connection returns.
- Changes from another device arrive on iCloud's own schedule, usually within seconds, sometimes longer.
- File ▸ Sync Now on the Mac sends anything that's waiting. It's also in Settings ▸ iCloud & Data, along with the times of the last upload and download.
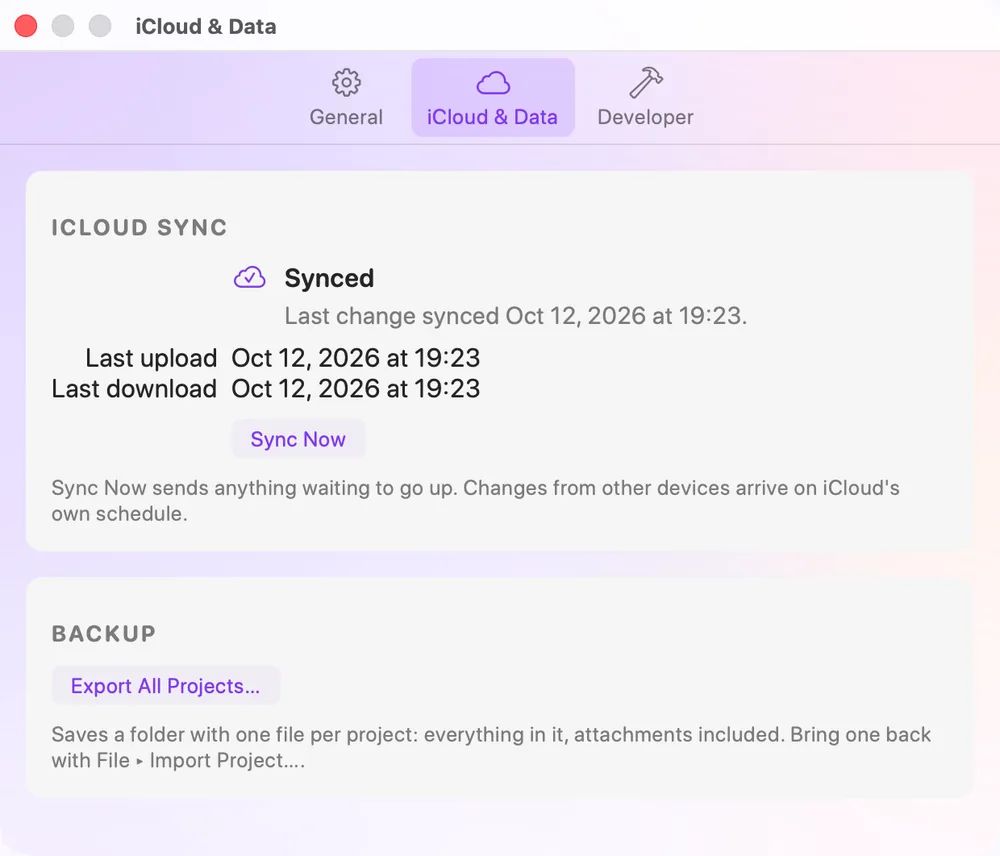
If the status line turns red, Pandopus tells you why and what to do. The usual causes are being signed out of iCloud, or iCloud asking you to accept new terms after a system update; both are fixed in System Settings, after which Pandopus picks up where it left off.
Settings
On the Mac, choose Pandopus ▸ Settings… (⌘,).
- General: light or dark appearance, and what the app shows when it opens. These apply to the device you set them on.
- iCloud & Data: sync status and Sync Now, and Export All Projects… for a backup of everything.
- Developer: the details about you as a developer that you look up again and again.
Developer details
The Developer tab keeps the details that belong to you and not to any one project: your Team ID, seller name, bundle ID prefix, support and marketing addresses, your copyright line, and links to App Store Connect and the CloudKit Console.
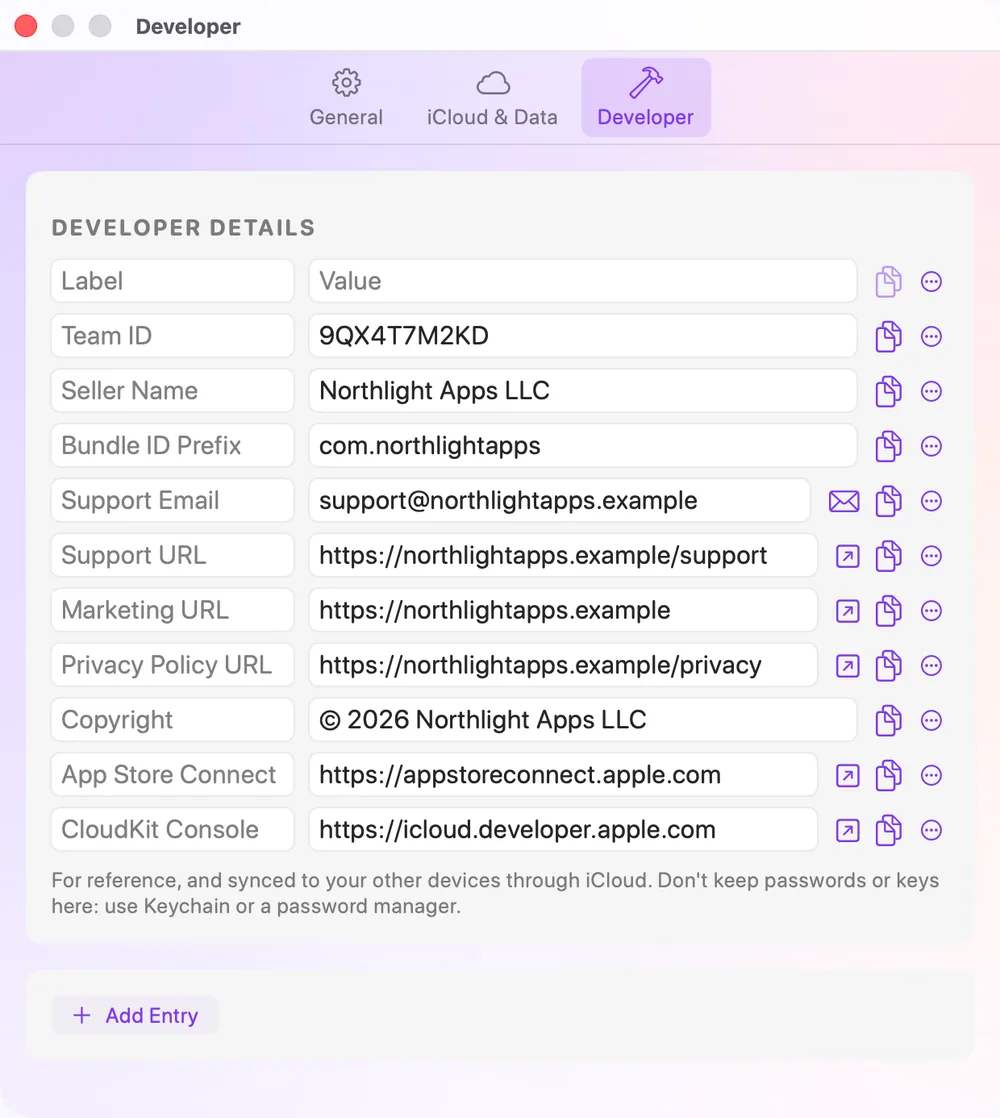
- Click the copy button beside an entry to copy its value. Links and email addresses have a button that opens them.
- Add Entry adds one of your own. Each entry has a label, a value, and a kind (text, identifier, link or email), which you change from its menu, where you can also delete it.
- When you create a release, its support link, marketing link and copyright start out filled in from here.
- The details sync to your other devices through iCloud.
These are for reference. Don't keep passwords or keys here: use Keychain or a password manager.
Keyboard shortcuts
| To do this | Press |
|---|---|
| New ticket, roadmap item or release, for the tab you're on | ⌘N |
| New project | ⇧⌘N |
| Go to the Dashboard | ⌘1 |
| Go to Ideas | ⌘0 |
| Go to a project tab, in the order shown after Overview | ⌘2 onward |
| Search all projects | ⌘F |
| Open the selected ticket in a sheet | ⌘O |
| Copy the selected ticket's number | ⇧⌘C |
| Duplicate the selected ticket | ⌘D |
| Confirm a sheet | Return |
| Cancel a sheet | Esc |
| Settings | ⌘, |
The Project and Ticket menus in the menu bar list everything you can do to the open project and the selected ticket.
If something isn't right
My changes aren't showing on my other device
Check that both devices are signed in to iCloud with the same Apple Account and are online. On the Mac, choose File ▸ Sync Now. On the iPhone, opening the app brings it up to date. Changes can take a little while to arrive on the other side.
I can't mark a version as released
The release says what's holding it back. Usually it's a ticket or roadmap item in the version that's still open, the version not yet being marked Done on the roadmap, or the project's App Store URL not being filled in.
A ticket's number changed
That happens when two devices gave out the same number while one was offline. The newer ticket takes the next free number once they sync. It happens once, and the number then stays.
I can't find a ticket
A filter may be hiding it. Choose Clear Filters in the Tickets tab. If its version was released, it's in the Shipped group at the bottom. Searching all projects by title or number finds it wherever it is.
The example project is gone and I want it back
On the Mac, choose Help ▸ Add Example Project.
Still stuck?
Tell us what's happening through the contact form and we'll help.